| Welcome to Sprocket School! This project is maintained by volunteer editors. Learn more about how this works. |
Splicer: Difference between revisions
No edit summary |
No edit summary |
||
| (12 intermediate revisions by 2 users not shown) | |||
| Line 1: | Line 1: | ||
A '''splicer''' is a tool used to join two pieces of film. Splicers are manufactured for different film gauges and perforation types, and specialized splicers using a diagonal cut are required for magnetic sound formats. | |||
===External Links | ==History== | ||
[[File:Estar-base-film-must-be-tape-spliced.jpg|right|thumb|200px|A film can label reminding film handlers that Estar (polyester) film base cannot be cement spliced.]] | |||
The earliest splicers used film cement to make a permanent join. Film cement can be used on nitrate and acetate stock, but will not adhere to polyester. With the rise of large-reel and platter projection and the transition to polyester as the dominant film base for theatrical distribution, cement splicers were replaced with tape splicers as the primary means of splicing film for the purpose of projection. Cement splicers remain in use for archival purposes, mainly in film lab settings. Polyester film can be permanently fused using ultrasonic splicers. While these splicers are not generally available to projectionists due to their high cost, ultrasonic splices that were performed during the manufacturing process are common in polyester release prints. | |||
==Cement Splicers== | |||
Cement splicers use a liquid film cement that consists of film base dissolved in a solvent. Typically, the film is cut so that each end overlaps by one perforation, with one side of the overlap falling on a frame line. Cement splices are performed with the emulsion up. The emulsion and binder on the lower layer are scraped off, and the base of the upper layer is abraded to provide a rough surface for the cement to adhere to. Cement is then applied and the two pieces of film are clamped together while the cement cures. Hot splicers are cement splicers that have a built-in heating element to speed up the curing process. | |||
Splices made with film cement have the benefit of being permanent. For this reason, they are preferred for certain archival purposes when dealing with nitrate or acetate film. Cement will not adhere to polyester film. If cement splices are poorly implemented, they can present problems during projection. Due to the thickness of a cement splice, it may jitter in the gate. When a cement splice is poorly joined (ex., when a corner is peeling up), the leading edge may catch in the gate and cause a film break. Cement splices that are misaligned, buckled, or too thick due to excess cement may cause the film to ride off the sprockets. When too much emulsion is removed, a white line may be visible on screen. Cement splicers also require the removal of at least one frame, and cannot be used to perform other repairs. In the era when only cement splicers were available, problematic repairs such as notching and trimming were prevalent. | |||
When cement splices are beginning to separate or experience other issues, they may be reinforced with repair tape. In most cases, the tape should be applied to the emulsion side of the splice to cover the leading edge, which could catch in the gate. | |||
<gallery widths=200px heights=200px mode=packed> | |||
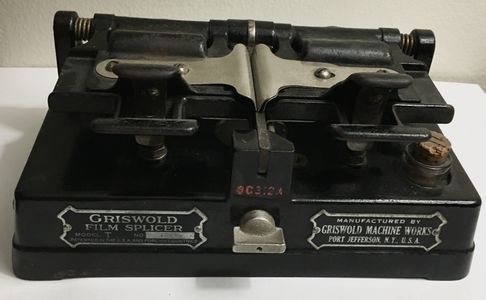
File:Griswold cement splicer.JPG|Griswold 35mm cement splicer. | |||
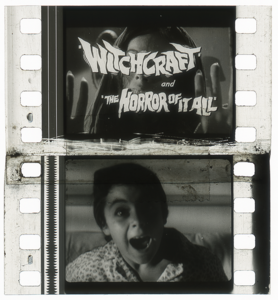
File:Witchcraft CementSplice.png|A misaligned cement splice with excessive emulsion loss. | |||
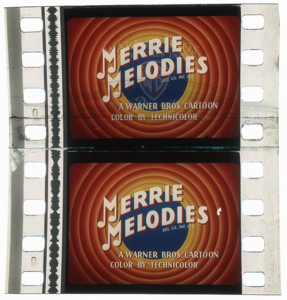
File:MerryMelodies CementSplice IBTech.png|Cement splice in a Technicolor cartoon. | |||
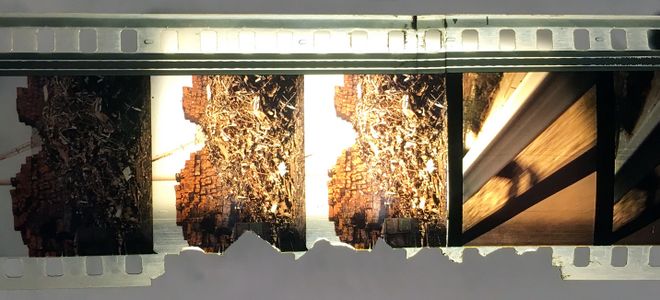
File:CementSplice EdgeLoss.JPG|Edge loss caused by a bad cement splice. | |||
</gallery> | |||
==Tape Splicers== | |||
[[File:CIR M3 splicer.JPG|right|thumb|200px|[[CIR M.3-35mm Special|CIR M3]] 35mm splicer with adjustable registration pins for accommodating shrunken film.]] | |||
[[File:Neumade 70ss splicer - open.JPG|left|thumb|200px|Neumade 70SS 70mm splicer.]] | |||
The splicers most commonly in use in projection booths are guillotine splicers that use adhesive roll tape. Earlier designs used pre-perforated press tape, which remains available for small gauge film. Tape splices may be applied to all film bases. | |||
In most cases, a tape splicer is calibrated to make a straight splice, and the pieces of film are joined end-to-end without an overlap. This is called a butt splice. Some projectionists intentionally modify their tape splicers to provide a slight overlap, usually no more than the depth of two layers of film. To achieve this, the cutting blade is shimmed so that the film to the left of the cut is longer than the film to the right of the cut, so when both ends of the film to be retained are cut on the left of the blade, they will overlap when laid on the splicer bed. Overlap splices will not stretch due to heat cycling like butt splices, but they will jitter in the gate during projection. Overlap splices are also used to accommodate shrunken film on tape splicers without adjustable registration pins. In the early days of tape splicing, Kodak recommended using an overlap the length of a full perforation, which is no longer a recommended practice. | |||
Tape splices have the benefit of being reversible and quick to apply, and can be performed without destroying additional frames. Tape splicers can also be used to apply repairs to other forms of damage that would otherwise need to be cut out or would require a less effective repair technique (ex., notching and trimming edge tears instead of taping them). | |||
The downside of tape splices is that they age over time. Splicing tape expands after repeated heat cycling when a film is projected, so even well-made butt splices will eventually begin to hinge. Tape adhesive can also leach out and transfer to other laminae of film, which is exacerbated by splicers with blades that are misaligned, leaving tape that runs past the film edge. After a certain age, tape can no longer be removed from film without leaving adhesive residue, and sometimes when removing tape applied to the emulsion side, the emulsion may peel off with the tape, destroying the image. | |||
Only clear tape should be used for archival projection. In the past, opaque tape and striped tape that covered the soundtrack area and/or the splice cut (also known as zebra tape) was used to mark reel changes for large-reel and platter projection. The edge of the tape will appear as a shadow on screen, so tape repairs should be applied so that the tape edge falls on a frame line when possible. | |||
==Ultrasonic Splicers== | |||
[[File:Ultrasonicsplice.png|right|thumb|250px|Ultrasonic splice.]] | |||
Ultrasonic splicers are used to fuse polyester film. This is most commonly done when preparing release prints for distribution. When properly made, ultrasonic splices are permanent, but they should always be tested before projection and replaced or reinforced with repair tape if they are too weak for projection. | |||
==See Also== | |||
* [[Splicing]] | |||
* [[CIR_M.3-35mm_Special|CIR M.3-35mm Special]] | |||
==External Links== | |||
* Super 8 and 8mm splicers at [http://super8wiki.com/index.php/Category:Splicers Super8wiki] | * Super 8 and 8mm splicers at [http://super8wiki.com/index.php/Category:Splicers Super8wiki] | ||
[[Category:Tools]] | |||
[[Category:Equipment]] | |||
[[Category:Film handling]] | |||
Latest revision as of 16:57, 7 October 2022
A splicer is a tool used to join two pieces of film. Splicers are manufactured for different film gauges and perforation types, and specialized splicers using a diagonal cut are required for magnetic sound formats.
History

The earliest splicers used film cement to make a permanent join. Film cement can be used on nitrate and acetate stock, but will not adhere to polyester. With the rise of large-reel and platter projection and the transition to polyester as the dominant film base for theatrical distribution, cement splicers were replaced with tape splicers as the primary means of splicing film for the purpose of projection. Cement splicers remain in use for archival purposes, mainly in film lab settings. Polyester film can be permanently fused using ultrasonic splicers. While these splicers are not generally available to projectionists due to their high cost, ultrasonic splices that were performed during the manufacturing process are common in polyester release prints.
Cement Splicers
Cement splicers use a liquid film cement that consists of film base dissolved in a solvent. Typically, the film is cut so that each end overlaps by one perforation, with one side of the overlap falling on a frame line. Cement splices are performed with the emulsion up. The emulsion and binder on the lower layer are scraped off, and the base of the upper layer is abraded to provide a rough surface for the cement to adhere to. Cement is then applied and the two pieces of film are clamped together while the cement cures. Hot splicers are cement splicers that have a built-in heating element to speed up the curing process.
Splices made with film cement have the benefit of being permanent. For this reason, they are preferred for certain archival purposes when dealing with nitrate or acetate film. Cement will not adhere to polyester film. If cement splices are poorly implemented, they can present problems during projection. Due to the thickness of a cement splice, it may jitter in the gate. When a cement splice is poorly joined (ex., when a corner is peeling up), the leading edge may catch in the gate and cause a film break. Cement splices that are misaligned, buckled, or too thick due to excess cement may cause the film to ride off the sprockets. When too much emulsion is removed, a white line may be visible on screen. Cement splicers also require the removal of at least one frame, and cannot be used to perform other repairs. In the era when only cement splicers were available, problematic repairs such as notching and trimming were prevalent.
When cement splices are beginning to separate or experience other issues, they may be reinforced with repair tape. In most cases, the tape should be applied to the emulsion side of the splice to cover the leading edge, which could catch in the gate.
-
Griswold 35mm cement splicer.
-
A misaligned cement splice with excessive emulsion loss.
-
Cement splice in a Technicolor cartoon.
-
Edge loss caused by a bad cement splice.
Tape Splicers


The splicers most commonly in use in projection booths are guillotine splicers that use adhesive roll tape. Earlier designs used pre-perforated press tape, which remains available for small gauge film. Tape splices may be applied to all film bases.
In most cases, a tape splicer is calibrated to make a straight splice, and the pieces of film are joined end-to-end without an overlap. This is called a butt splice. Some projectionists intentionally modify their tape splicers to provide a slight overlap, usually no more than the depth of two layers of film. To achieve this, the cutting blade is shimmed so that the film to the left of the cut is longer than the film to the right of the cut, so when both ends of the film to be retained are cut on the left of the blade, they will overlap when laid on the splicer bed. Overlap splices will not stretch due to heat cycling like butt splices, but they will jitter in the gate during projection. Overlap splices are also used to accommodate shrunken film on tape splicers without adjustable registration pins. In the early days of tape splicing, Kodak recommended using an overlap the length of a full perforation, which is no longer a recommended practice.
Tape splices have the benefit of being reversible and quick to apply, and can be performed without destroying additional frames. Tape splicers can also be used to apply repairs to other forms of damage that would otherwise need to be cut out or would require a less effective repair technique (ex., notching and trimming edge tears instead of taping them).
The downside of tape splices is that they age over time. Splicing tape expands after repeated heat cycling when a film is projected, so even well-made butt splices will eventually begin to hinge. Tape adhesive can also leach out and transfer to other laminae of film, which is exacerbated by splicers with blades that are misaligned, leaving tape that runs past the film edge. After a certain age, tape can no longer be removed from film without leaving adhesive residue, and sometimes when removing tape applied to the emulsion side, the emulsion may peel off with the tape, destroying the image.
Only clear tape should be used for archival projection. In the past, opaque tape and striped tape that covered the soundtrack area and/or the splice cut (also known as zebra tape) was used to mark reel changes for large-reel and platter projection. The edge of the tape will appear as a shadow on screen, so tape repairs should be applied so that the tape edge falls on a frame line when possible.
Ultrasonic Splicers

Ultrasonic splicers are used to fuse polyester film. This is most commonly done when preparing release prints for distribution. When properly made, ultrasonic splices are permanent, but they should always be tested before projection and replaced or reinforced with repair tape if they are too weak for projection.
See Also
External Links
- Super 8 and 8mm splicers at Super8wiki


